Programs Needed
- Paint (included on Windows computers)
- Jasc Animation Shop
Tutorial
- Make your blinkie using the blinkie maker.

- Take a screenshot of your blinkie (press the "Print Scrn" button on your keyboard or use the Screenshot Tutorial).
- Open Paint.
- Go to Edit > Paste. If you cannot paste, make sure that the Selection Tool (
 ) is highlighted.
 - Crop the image so that you only see the blinkie and there are two pixels around the edges. When you are done cropping the blinkie, it should look like this when magnified by 6:
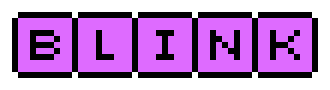
- Fill in the first letter block (in my case, I'm spelling "BLINK" so I would fill in the B) with a different colour by using the Paint Can (
 ).
).
- Save your picture as "1.bmp"
- Using the Paint Can (), change the first block back to your first colour, and fill in the second box with your second colour (yellow).

- Save your picture as "2.bmp".
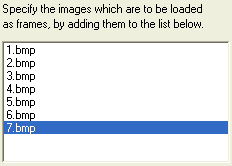
- Repeat steps 8 and 9 for each of the other blocks, and save your third picture as "3.bmp", fourth picture as "4.bmp", fifth picture as "5.bmp", and so on.


"3.bmp" "4.bmp" "5.bmp" - Fill in all of the blocks with your second colour (yellow).

- Save your picture now as the next number in your sequence (if you have five pictures already, save this picture as 6).
- Fill in all of the blocks with your first colour (purple).
- Save your picture now as the next number in your sequence (the number from step 12 plus 1).
- Close Paint.
- Open Animation Shop (Start > Programs > Jasc Software > Animation Shop 3).
- Go to File > Animation Wizard.
- A box should come up that says "What do you want the total dimensions of the new animation to be?". Select "Same size as first image frame". Click Next.
- A box should come up that says "What do you want to set as the default canvas colour for the animation?". Select "Transparent". Click Next.
- A box should come up that says "Where within the animation frame should such images be located?". Select "Upper left corner of the frame". Under "When the image occupies only a part of the frame, how should the rest be filled?" select "With the canvas cover". Make sure "Scale frames to fit", is UNCHECKED. Click Next.
- A box should come up that says "Do you want the animation to be looped?". Select "Yes, repeat the animation indefinitely." Under "How long do you want each frame to be displayed (in 1/100th of a second)?" type "10". Click Next.
- Click on the "Add Image…" button. Find the folder where you save your blinkie pictures. Click on your first picture ("1.bmp"), then hold Ctrl on your keyboard and click on all of the other blinkie pictures ("1.bmp", "2.bmp", "3.bmp", etc). Click Open.
- You can reorder your pictures by using the "Move Up" and "Move Down" buttons so that they are in numerical order ("1.bmp", "2.bmp", "3.bmp", etc). Click Next.
- Select your second last picture (the one filled in with your second colour). Hold Ctrl on your keyboard and click on your last picture (the one filled in with your first colour). Right click on the last picture and select "Duplicate Selected".
- Go to View > Animation.
- Go to File > Save As.
- Select GIF from the drop-down list below the filename and save.
Troubleshooting
If the colours change, or the blinkie doesn't look right, follow the steps below.
- Go to Edit > Undo.
- Go to File > Optimization Wizard.
- Under "Optimize For" check off "Animated GIF file". Uunder "When Finished" check off "Replace".
- Click Customize.
- Under the "Colour" tab, select "255 Colours", "Optimized Octree", and "Nearest Colour".
- Under the "Optimizations" tab, check off all but the last one.
- Under the "Partial Transparency" tab, check off the first one, and set it to "4". Select "Yes, blend with" and change the colour to white.
- Click OK and Next a few times, and finally click on Finish.
- Save your blinkie again.
Blinkie Example
![]()